Turbo-BrainVoyager v3.2
SVM Training
The Multi-Voxel Pattern Classification dialog can be used to train support vector machines (SVMs) to associate distributed activity patterns with class labels that correspond to two or more conditions ("classes") of a paradigm. The Trial Estimation tab is used to specify how responses should be estimated for individual trials at each voxel. The Train SVM Classifier tab is used to create training data for a specified region-of-interest (ROI) from the whole-brain trial response data and to perform the actual training process. The classifier supports multi-class problems, i.e. distributed patterns can be assigned to two or more different conditions. The trained classifier can then be tested on completed run data using the Test Classifier tab. For real-time classification, use the Real-Time SVM Classification dialog.
Trial Estimation
In order to obtain training exemplars for different classes, response values are extracted or estimated for each individual trial as opposed to estimating a voxels mean response of a condition in a standard GLM. Estimated single-trial responses across relevant voxels (e.g. from a region-of-interest) then form the feature vectors used to train the classifier. The estimated trial response might be as simple as the activity level at a certain time point (e.g. at the time of the expected hemodynamic peak response) or the mean response of a few measurement points around the peak response relative to a pre-stimulus baseline. In TBV, usually a GLM is used to fit an expected hemodynamic response to measured single trial data. The beta value or t value estimating the amplitude of the hemodynamic response is then used as the trial response value.
To add time course data for training trials from one or more completed runs, the "+" button in the Input data field can be used. The selected FMR run data will be listed in the Time course data box in the Input data field (see snapshot above). From a selected functional data file, the referenced protocol is shown in the Protocol text field and the associated experimental conditions are extracted and displayed in the Protocol condition selection box for the currently selected file. Note that Turbo-BrainVoyager at present only supports protocols in "Volumes" resolution for pattern classification. For the displayed example data, the conditions displayed are "resting", "motor imagery", "mental calculation" and "inner speach". The first two main conditions are selected automatically as targets for single-trial estimation. The first condition is skipped under the assumption that it corresponds to a "baseline" or "rest" condition. It may be useful to select additional conditions (e.g. "inner speach" in this example) in case that multiple pair-wise classifications or multi-class classifications are planned. If trials from more than two conditions are included and the pairwise training option will be used in the Train SVM Classifier tab (see below), any two condition pairs can be selected for training. If the multi-class option will be chosen later, all conditions included at this stage in the Protocol condition selection box will be used as class labels to train the classifier, i.e. it is not (yet) possible to exclude estimated trials of conditions that are included here.
The trial estimation step calculates a GLM for each trial per voxel by creating a data window around trial onset. For estimating beta or t values (see below) with single-trial GLMs, a two-gamma hemodynamic response function (HRF) is used. The data window for a trial is specified with respect to the onset of a trial as specified in the protocol(s) of the included FMR data set(s). The Pre-onset spin box can be used to specify how many data points should be included before the trial onset data point. The offset of the trial data window can be either specified absolutely or with respect to the duration of the trial as specified in the protocol. If the Use trial duration option is turned off, the end of the trial window is specified with the Post-onset spin box specifying the number of time points included after the stimulus onset point. If, for example, the pre-onset value is 2 and the post-onset value is 8, the data window used for estimating the trial response would be w = pre-onset + 1 + post-onset = 11 data points. Clicking the Auto button after setting the pre-onset interval will provide a value for the post-onset interval that ensures that the interval is just long enough to let the expected BOLD response turn back (largely) to baseline. The described way to specify the trial data window is well-suited in case that all trials have the same duration. In case that trials of a condition may have different durations, the trial duration option should be used to specify the data window. If the Use trial duration option is turned on, the offset is determined by the trial duration plus the value specified in the Post-trial spin box as w = pre-onset + trial-duration + post-trial; in case of a pre onset value of 2, a post-trial value of 4 and a trial duration of 5 this would, for example, result in a data window of w = 2 + 5 + 4 = 11 data points. Note that for both versions available to specify the trial data window, the duration of a trial as specified in the protocol will be used to determine a box-car reference function that is set to 1 at the trial onset data point and subsequent points reflecting the trial duration, e.g. 0 0 1 1 1 1 1 0 0 0 0 in the described example case. The constructed box-car reference is finally submitted to the two-gamma hemodynamic response function to calculate the shape of the predictor as used in the single-trial design matrix.
For a more robust fit of the model, a linear trend confound predictor may be added (next to the constant predictor and the main predictor) for estimating (and removing) a linear trend by checking the Linear trend option. This option should not be used if already a global linear trend has been added to the standard GLM or when the FMR data has been detrended using the FMR Post-Processing dialog. The options in the Resulting estimates field allow to specify the resulting type of single-trial estimate, which can be t values (T-values option), beta values (Betas option) or percent signal change beta values (Betas (% change)) option (default). The t values option is selected as default since it often provides the most robust results. As default, the time course data within each trial window is z normalized, which can be turned off by un-checking the z normalization option. In case that percent change betas are estimated, z normalization is automatically turned off and the option is disabled. In order to exclude voxels in the background (that usually have low signal values) use the Exclude vals < spin box; in case this intensity-based voxel selection should not be used, change the default value 100 to value 0.
The trial estimation process can be started by clicking the GO button. The resulting single-trial estimates per voxel are stored in slice-based functional map (.FMP) files that are automatically made available in the Train SVM Classifier tab. For each included time course FMR file, one corresponding FMP output file will be created.
SVM Classifier Training
The Train SVM Classifier tab (see snapshot above) is used to create SVM training data for a specified region-of-interest (ROI) from the data listed in the Trial data field (that is created using the steps described above or loaded from previously stored FMP files). The selected ROI can be as big as the whole brain/cortex or as small as a few voxels. A typical way to create a ROI is by using an overall contrast (effects vs baseline) and by dragging a large rectangle encompassing many (active) voxels. In order to include more voxels, you may lower the threshold using the Threshold spin box in the right lower corner of the program window. To increase the number of slices used for ROI selection, you may also want to increase the value of the MultiSliceROIs spin box; in order to define a ROI across all slices, a large multi-slice value of e.g. 30 should be used. When entering the dialog, all currently defined ROIs (associated with respective ROI time course plots) will be listed in the ROI-based feature selection box. If you have defined more than one ROI, select the one that should be used to specify the features (voxels) used for training the classifier.
Before the SVM training data can be determined, one needs to specify the classes that should be used for training in the Selection of classification task field. For a two-class task, you may select one class in the First class and one class in the Second class selection box. If the FMP trial response files contain only estimates for two conditions, the class boxes are already filled with the two class names, respectively. In case that more than two classes are available, select the relevant classes using the two selection boxes. In the example shown above, three conditions are used and one of the three possible pairs, "motor_imagery" vs "mental_calculation" has been selected. For a multi-class task, turn on the Multi-class option; this will prepare creation of a learning task with all conditions available in the FMP trial estimation files. Note that it is not possible (in the present version) to select a subset of three or more classes from four or more available classes: if you want to use more than two classes but not all available classes, you need to specify the classes in the earlier stage of trial estimation. Note also that the Multi-class option will only be enabled if at least three conditions are available. If the option is turned on, the two class selection boxes will be disabled.
When 1) an ROI has been selected for 2) available trial estimation FMP maps and if 3) the classes for training have been specified, the actual training data for the SVM classifier can be generated by clicking the Create button in the Create ROI-MVPA data field. This results in a training data MVP file; the name of the generated file will appear in the Training/test data text box in the ROI-MVPA data field. The For training and For testing options in this field are only available to help the user to distinguish the purpose of a specific training data file. If the For training option is selected (default), the name of the resulting .MVP training data file will begin with the "Train_" substring whereas it will begin with "Test_" in case that the For testing option is selected.

The snapshot above shows the ROI-MVPA data field of the ROI-SVM tab after clicking the Create button using the Multi-class option in the Selection of classification task field. The name of the resulting training data file reflects which ROI has been used (ROI 1). It also indicates which conditions are used and how many trials (exemplars) are available for each class. In the displayed example, the names of the three conditions are shown followed by three values (6) indicating that each of the three classes contains 6 trials. Click the Plot button to create a visualization of the training data.

With the created .MVP training data file (MVP = multi-voxel pattern), a support vector machine can now be trained. When the Train button is clicked in the Support Vector Machine (SVM) field, SVM training is performed for the data in the file listed in the Training/test data text field; the SVM will use default settings including a linear kernel and a value of "1" for the penalty (regularization) parameter "C". You may also let the program find an optimal C value by running a cross-validation procedure (turn Cross-validation option on and set an appropriate Folds value) that uses only the training data (not yet supported, will be available in later release). While it is possible to select a non-linear kernel using the Kernel combo box in the Support Vector Machine (SVM) field, it is recommended to stick to the default linear kernel since this allows to interpret the weight vector of the trained SVM. The training process results in a .SVM file that is stored to disk and also shown in the Classifier text box (see snapshot above). Note that if one wants to run another classifier on the same data with different settings, one needs not to re-create the training data but can directly select the desired MVP file (if already existing) using the "..." selection button next to the Training/test data text box.
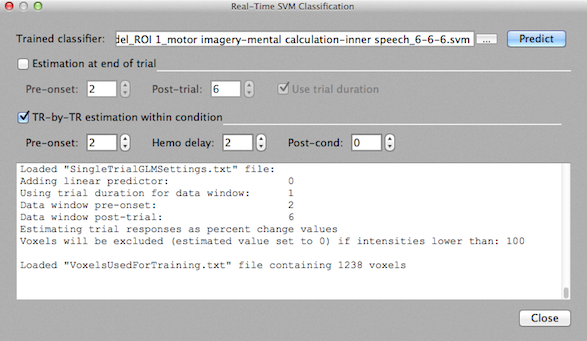
Note that the Log pane in the Test Classifier tab shows additional information about the trial estimation and SVM learning process. The last information printed in the log will show the result of applying the trained SVM on the training data itself. This should lead to a accuracy value of 100%. To test the classifier on new data, use the Test Classifier tab for completed run data or, for real-time applications, the Real-Time SVM Classification dialog that produces incremental (online) predictions.
Offline SVM Classifier Testing
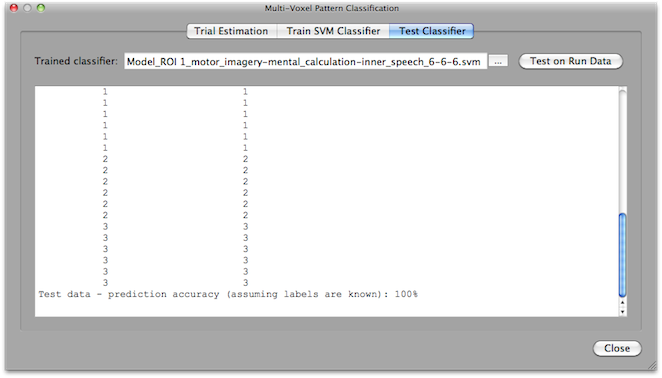
To test completed run data using the Test Classifier tab of the Multi-Voxel Pattern Classification dialog, one needs to create the .MVP file for the testing data in the same way as described for the training data. This includes using the same ROI but selection of different .FMP files. Before clicking the Create button in the Create ROI-MVPA data field, it is advised to select the For testing option in order to name the resulting .MVP file as "Test_..." data. For testing, you do not run the classifier training step but use the previously trained classifier. The previously trained classifier can be loaded using the "..." browse button on the right side of the Trained classifier text box. To test the classifier on the data of the loaded run, click the Test on Run Data button. The prediction results will be printed in the Log pane. In the example above, a 3-class problem was trained and each line shows two values, the first is the predicted class value (1, 2, or 3 in this case) and the second value shows the correct label (if available). Since in the snapshot above the test was performed on the same data used during training, all patterns are (as expected) classified correctly. Of course, testing should be performed on new data sets, i.e. subsequent runs in the same scanning session. In the context of BCI applications, testing needs to be performed incrementally on a trial-by-trial basis during scanning. For this purpose, the Real-Time SVM Classification dialog can be used.
Note that the data from the test run(s) should match to the previous training run(s), i.e. the data should be collected during the same scanning session with runs using the same slice position parameters; furthermore, the same ROI as used during training must be used to create the .MVP file.
Copyright © 2014 Rainer Goebel. All rights reserved.