In case the source data for workflow processing are coming directly from the scanner in the form of DICOM files, the Create Document Workflow can be used to convert them into NIfTI files in a BIDS compatible folder structure. In case that the scanner data has been already wrapped in NIfTI files, the Import NIfTI Document Workflow described in this topic can be used to provide input for data analysis. This makes it possible, for example, to start with data from public repositories providing NIfTI files but it is also an option when one uses BrainVoyager's Create Document Wizard or scripts or external tools to create NIfTI files. To use the Import NIfTI workflow, the NIfTI files need to be copied into the BIDS-compatible subject and session folders inside the project. Running a created workflow for one document then simply looks for the corresponding document NIfTI file in each subject folder and if found registers the files in the database of the data analysis manager to become available as input for further proocessing. The NIfTI files can be manually copied to the right BIDS-compatible sub-folders in the project before creating the import NIfTI workflow; alternatively the workflow dialog can be used to copy the data in its appropriate location with adjusted BIDS-compatible names (if needed) as described below. Note that before defining a NIfTI document workflow all subjects should be first added in the Data Analysis Manager's main window since the workflow will only check for NIfTI files in folders of subjects that are known in the analysis manager database.
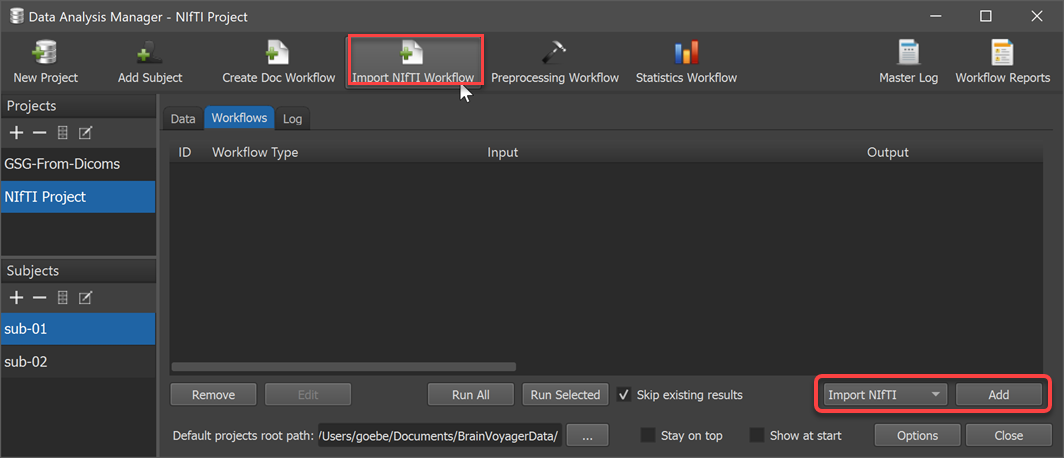
To define the import NIftI workflow and to copy NIfTI files into the project, the Import NIfTI Document Data dialog is used that can be invoked using the Import NIfTI Workflow icon in the main toolbar of the Data Analysis Manager window (see screenshot below). Alternatively the Add button in the Workflows tab can be clicked after selecting the Import NIfTI entry in the Workflows selection box on the left side of the Add button (see screenshot below).
The launched dialog (see screenshot below) consists of two tabs. The Workflow tab can be used to add a document based on its NIfTI files. In case that the NIfTI files are already in the correct place with BIDS-compatible names, only one example document NIfTI file needs to be selected to create the workflow. In case that one needs to copy the data into the project first, the Copy To Project tab of the dialog can be used.
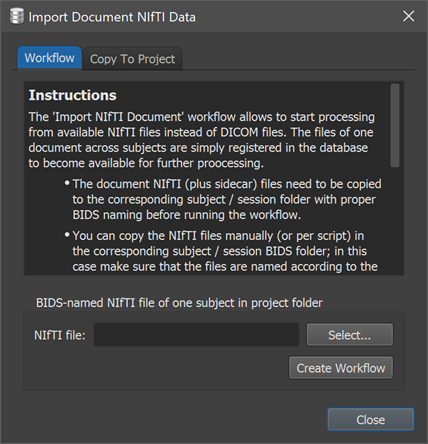
The dialog presents short instructions on its first tab that summarize the information provided in this topic. In case the NIfTI files are properly named and placed in the correct subject sub-folders already, one can skip the next section and consult the 'Define Import NIfTI Workflow' section below.
Since the created workflow assumes that the NIfTI files are already at the right place within the project, one must first copy them (plus associated sidecar files) from their current location to the corresponding subject / session folder with proper BIDS naming before one can define and run the workflow (see subsequent sections). When copying the files manually (e.g. with 'File Explorer' on Windows or 'Finder' on macOS) or via (BrainVoyaer) scripts in the corresponding subject / session folder, it is important hat the files are also named according to the BIDS standard. The Copy To Project tab can be used to support this process. In case that NIfTI files are not yet named according to the BIDS standard, the provided functionality allows to assign a NIfTI file to a subject, session, run and document type, and the provided information will be used to rename the file appropriately and to copy it into the appropriate folder.
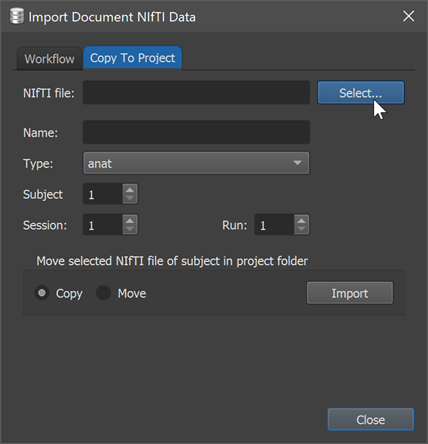
To copy a NIfTI file belonging to a (anatomical, functional or diffusion-weighted) document into the project, the Select button of the Copy To Project tab can be used to select the NIfTI file at its current location (see screenshot above). The appearing Open File dialog supports selection of (compressed) single-file NIfTI files ending with '.nii' or '.nii.gz'. After selecting a file, its name is shown in the NIfTI file text field (see screenshot below). Furthermore, the file name is analyzed and the BIDS fields below the NIfTI file entry are filled in case that the file name already follows the BIDS naming convention. If this is not the case, default values are shown that need to be changed.

In the example above, the selected NIfTI file follows already the BIDS naming convention and the program, thus, has recognized its type ('func'), the (numerical) subject ID (1), session (4), run (1) and task name ('blocked'). In case the file would have a custom non-BIDS compliant name (e.g. 'experimentA_s1-session2-r4.nii.gz'), the fields would not be filled correctly and the correct values for Type, Subject, Session, Run and Task name need to be entered. Note that even if the selected file has a BIDS-compatible name, one may still re-assign / change any of the available pieces of information. A file can be, for example, re-assigned to another session or even subject, but one should be, of course, careful with such changes, and one needs to be consistent. If, for example, the task name for a functional document is changed, the corresponding files from all other subjects need to receive the same task name, otherwise the data analysis manager will not treat the data as representing the same document.
After verifying or chaning the information in the BIDS fields, one can click the Import button in the Move selected NIfTI file of subject in project folder field to copy the file into the respective subject / session / type folder inside the project. In case you want to remove the original file, you can change from the default Copy option to the Move option in the field before clicking on Import. Note that the imported file will be stored under a BIDS-compatible name that is constructed from the information provided in the BIDS fields. This may result in the same name as the original file but it may also deviate substantially if the file did not follow BIDS naming convention.
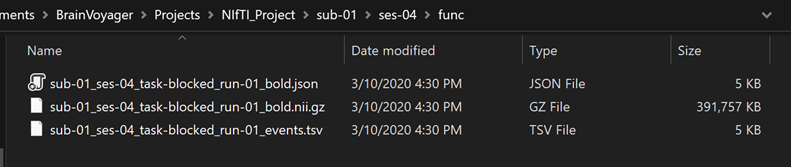
The snapshot above shows the result of clicking the Import button for the selected file shown in the screenshot above. As one can see, the program not only copies the selected NIfTI file into the 'NIfTI_Project' folder but also '.json' and '.tsv' (protocol) sidecar files are copied to the target location (if detected). If the NIfTI files for all subjects of one (or more) documents have been imported, they can be made known to the data analysis manager by defining and running the Import NIfTI Document Workflow.
When the NIfTI files for one document (e.g. one anatomical scan or one functional run) of all subjects are placed in the approrpriate BIDS folders, the Workflow tab of the Import Document NIfTI Data dialog can be used to define the workflow. In order to know the document (scan) type, session and other information, one needs to select one example NIfTI file in the project folder that belongs to the respective document. The screenshot below shows the dialog after selecting the NIfTI file imported into the project above using the Select button.
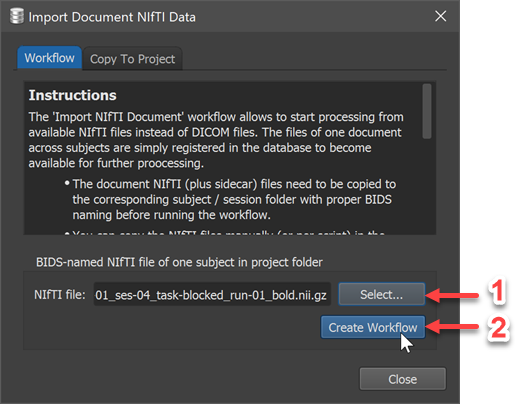
From the information of a single selected file, the program creates the subject-agnostic information (e.g. session, run, task name) that identifies the document for each subject. To define the Import NIfTI workflow, finally press the Create Workflow button. The dialog will then close and the new workflow appears in the Workflows tab of the Data Analysis Manager main window. In the same way as described above, additional import NIfTI workflows can be defined for additional (anatomical, functional, diffusion-weighted) documents.
After defining the ==== in the Import Document NIfTI Data dialog, the new workflow appears in the Workflows tab of the Data Analysis Manager main window (see screenshot below).
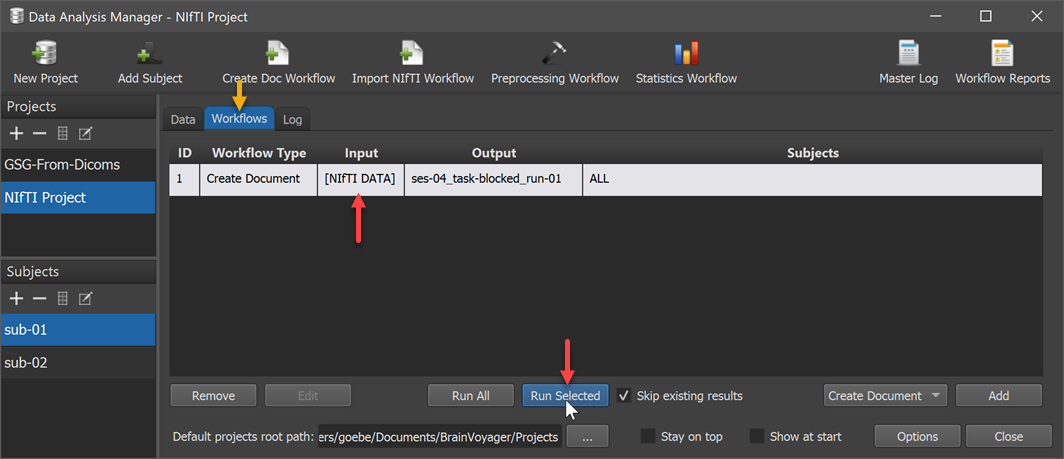
When switching to the Data tab, one will see that the document is already visible for each subject but the actual data file is not linked yet. To make the actual NIfTI files known to the data analysis manager, select the created workflow (see upper red arrow above) followed by a click on the Run Selected button (see second red arrow). The program is then looking in the respective sub-folder of the document in each subject's folder and links the file on disk to the generic document name. Since this process is not processing any files but just links data files to a document, the process finishes very quickly.
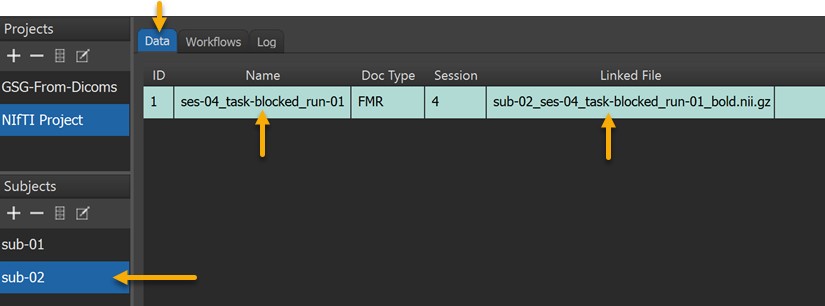
A generated short report will also inform abou tthe performed procedure. To inspec the document data at the subject level, one can switch to the Data tab of the data analysis manager. The screenshot above shows, for example, the data of subject 2 ('sub-02') containing at this stage of only one NIfTI file. The single entry shows the generic document name (left upward pointing arrow) as well as the linked actual NIfTI file (right upward pointing arrow). Since the data is now available in the project and known to the data analysis manager, the data can serve as input for subsequent preprocessing workflows.