Turbo-BrainVoyager v3.2
General Setup
This guide contains a description how to set up Turbo-BrainVoyager with a Siemens MRI system but the network related setup steps are similar for all manufacturers. The general network setup will mainly be described with the use of a Microsoft Windows based MRI system. MRI systems based on other operating systems can easily be adapted from this guide. All the information in this guide are examples how a common setup could look like. Brain Innovation is not responsible for any damage caused by using this guide. In terms of questions or comments send an email to support-at-brainvoyager-dot-com.
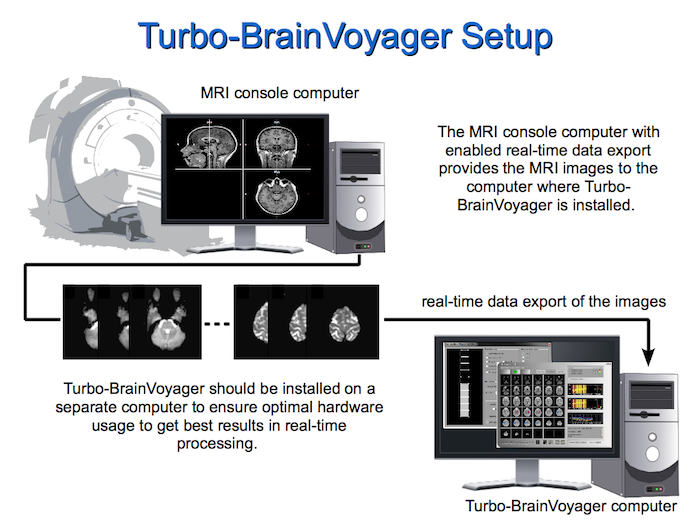
The setup of TBV in the scanner environment consist mainly of two parts: Enabling the real-time data export of the MRI images and the access to this exported data from another computer running TBV. The real-time data export must be activated on the MRI console computer (recommended) or can be part of special designed sequences in combination with an export tool on the ICE computer.

As one can see in the picture above the MRI images are exported in real-time from the MRI console computer to the TBV computer. On the TBV computer all images will be read and processed from a specified directory called "watch folder" in TBV. It is essential that the MRI console computer exports the images to a shared folder provided by the TBV computer. Otherwise the real-time export could be decelerated because of multiple network queries that are necessary to read the MRI images. We recommend using the latest version of the operating system to benefit from current versions of the underlying sharing protocols. The schematic network structure, which will be described below, is valid for all scanners and operating systems. To ensure a fast and reliable data transmission and processing please verify that all computers that are not necessary for the fMRI experiment are excluded from the network or turned off. The more computers are in the network the more likely it becomes that a prolonged (i.e. non real-time) transmission time occurs. It is recommend to set the power plan of your operating system (if available) to maximum performance. This ensures that the whole processing of the MRI images including online reconstruction from k space to image space can be realized as fast as possible.
We recommend a minimum to use a computer for TBV that possesses a minimum of 2GB of working memory, powerful processor and gool OpenGL capable graphics card. While TBV is a highly efficient program, the usage of latest PC hardware should be favored.
Since software release VB15A, Siemens supports the real-time export of DICOM mosaic images (one file per functional volume) as described in more detail in the topic Settings for Siemens Data. The recommended way by Siemens to turn this functionality on is to use the IDEA command tool after switching in advanced user mode on the console computer (see also documentation by Siemens). As an alternative solution, the respective "config" file "C:\MedCom\config\Ice\IceConfig.evp" may be changed manually, or better, by using the "XBuilder" program that can be started using the Windows "Run" tool. In XBuilder, change the three export parameters "OnlineTargetPort" (to "-1"), "OnlineTargetHostName" (the name or IP of the computer in the network receiving data) and "OnlineTargetPath" (to the name of the folder of the computer in the network, e.g. "\\192.168.1.2\rtfmri"). Note that the configuration file is overwritten each time a new patient is registered, i.e. the settings have to be repeated each time you want to use the real-time export for a new subject.
Older Siemens scanners with older software (A-line, like Allegra) require special setups for real-time export such as, for example, the ICE export tool by Nikolaus Weiskopf (Welcome Trust Institute for Neurology, London) that incrementally exports ANALYZE volumes together with position information (POS files) that can be used in TBV to align functional data to a previously recorded anatomical data set.
Take a look into the support of your operation system to get to know how to enable and access shared folders from other computers via the network.

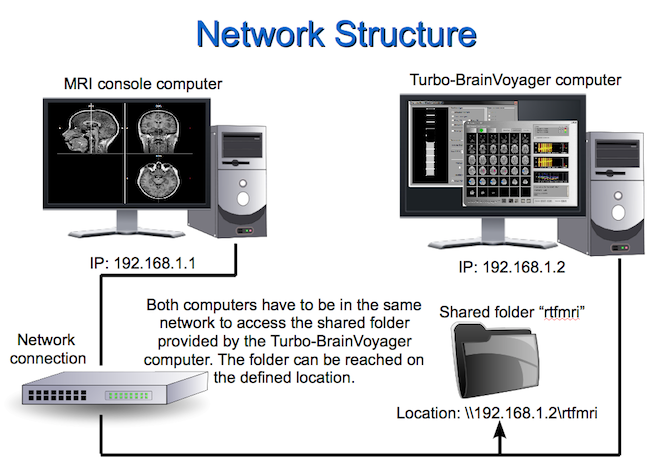
An example network structure (based on Microsoft Windows operating systems) is shown in the image above. The shared folder is provided by the TBV computer and can be reached via its host name or IP. In this case the TBV computer can be reached at “\\192.168.1.2”. Just append the folder name to access the folder directly. Enter the address (“\\192.168.1.2\rtfmri”) into the address line to access the folder.
Be sure that the connection between the two computers is established and the computers can reach each other. To ensure that you can use the computer network administration utility Ping (only on Microsoft Windows based systems) which can be accessed from the command prompt (use “windows-key”+”r-key” and type “cmd”). In this specific example the connection can be tested by typing “ping 192.168.1.1” in the command prompt of the TBV computer. As results the ping times will be shown. If the computer cannot be reached “Request timed out.” will be displayed. If this happens the IT or MRI technician should be asked for further help.
After setting up the connection one can define the settings and parameters in the TBV Settings dialog.
Copyright © 2014 Michael Lührs and Rainer Goebel. All rights reserved.