Turbo-BrainVoyager v4.4
The Neurofeedback Dialog
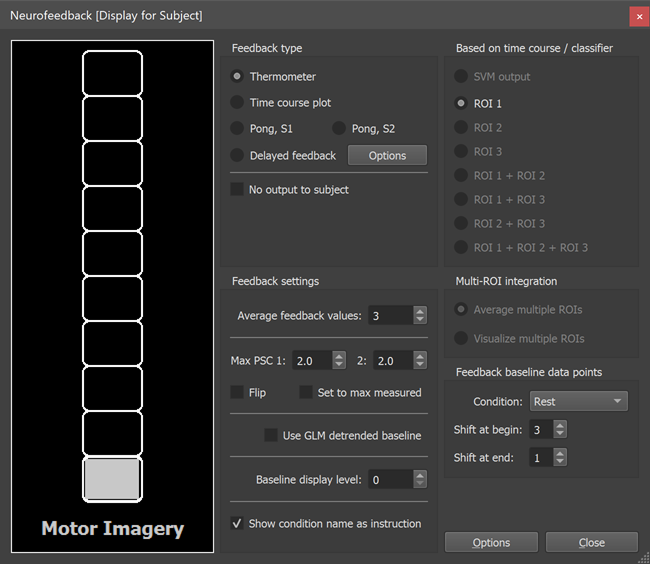
The Neurofeedbackdialog (see screenshot above) can be invoked by clicking the ==Neurofeedback== item in the ==BCI== menu. The dialog allows to select the data from one or more ROIs as the source of feedback information for a participant in the scanner during an ongoing measurement. For neurofeedback runs, it is recommended to pre-load a prepared ROI file (e.g. from a previously performed localizer run) using the ==Pre-Load ROI== button in the main button field at the top of the main window before starting real-time analysis. The basic neurofeedback calculations can be controlled with the options in the Feedback settings and Feedback baseline data points fields. For details see the ROI Activation Feedback Calculation topic. Since TBV 3.2 it is also possible to select the output of a running SVM classifier as a neurofeedback signal.
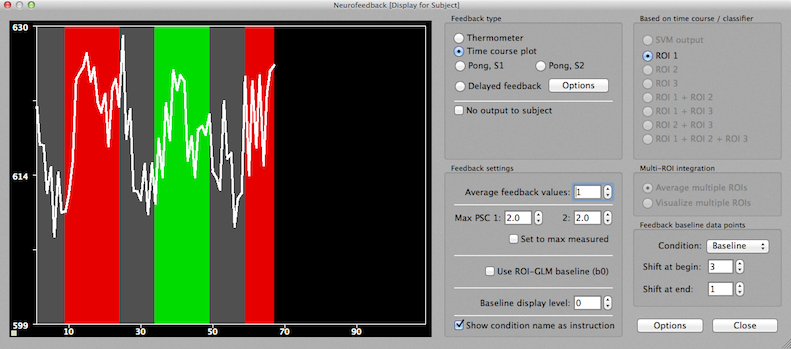
Besides defining the data source for feedback, the dialog also allows to create different visualizations that can be presented to a participant in the scanner for neurofeedback training. The calculated feedback values can be presented in two major visualization formats to the subject. A useful visualization of feedback information is to use a thermometer display (see screenshot above), which provides feedback about the amount of activity in a well-known mental concept to participants. The (detrended) ROI time course can also be visualized directly as a time course display (see below). These visualization options can be selected in the Feedback type field by selecting the Thermometer (default) or Time course plot option, respectively (the "Pong" options are for special hyperscanning applications not described here, for details contact support at brainvoyager dot com). The Delayed feedback option allows to calculate a mean feedback signal that can be used for custom feedback displays, i.e. at the end of modulation blocks.
Output formats. Besides using exported numerical values, the feedback contents drawn in the plot window on the left side can be used as images for presentation software. At each volume, its current content is saved as a bitmap (.PNG file) to disk in the neurofeedback target folder specified in the TBV Settings dialog (corresponding as default to the general target (output) folder). In an experiment named "S3_FFA_Feedback", the files incrementally saved in the neurofeedback target folder would be called "S3_FFA_Feedback-1.png", "S3_FFA_Feedback-2.png" for data points (volumes) "1", "2" and so on. These files can be picked up by custom software for final display to the subject in the scanner. Please consult our support for advice about software to present generated (e.g. thermometer) images, or how to generate custom feedback. In case that the thermometer display is used, feedback can be turned off (i.e. displaying an empty thermometer) at specific moments in time by checking the No output to subject option. Feedback can also be turned off for a selected condition using the Neurofeedback Options dialog (see below).
Besides the image output, the Neurofeedback dialog also saves information to disk that can be used for custom feedback calculations and advanced visualizations. For details see section 'Logging Moment-to-Moment Calculations to Disk' in the ROI Activation Feedback Calculation topic.
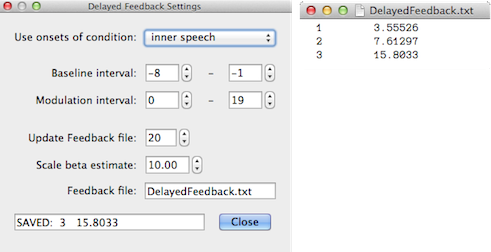
Delayed Feedback. The Neurofeedback dialog allows to provide not only direct (ongoing) feedback but also feedback at the end of blocks. Such "delayed feedback" of the mean level of activity of a whole block may be helpful in the context of some clinical neurofeedback applications, e.g. when the participant in the scanner should solely concentrate on a mental task without being "distracted" by moment-to-moment feedback signals. This feature can be turned on by enabling the Delayed feedback option in the Feedback type field of the Neurofeedback dialog. Click the Options button in this field to invoke the Delayed Feedback Settings dialog (see snapshot above) that can be used to select the protocol condition that should be used for calculating delayed feedback values ("inner speech" in the snapshot above). You may also specify the data points used for calculating the baseline value (Baseline interval) as well as the time points used to calculate the average activation value relative to the baseline level (Modulation interval). You need also to specify a Feedback file (default name: "DelayedFeedback.txt") that will be used to save the mean feedback values in the feedback target folder; the stored information (see right side in the snapshot above for an example of a saved text file) can be used for providing feedback to the subject using custom software. The Update feedback file value specifies the time point after the onset of the selected feedback condition when the feedback file should be updated writing the newly obtained feedback value to the file; note that the value in the Update feedback file spin box must be larger than the end point of the interval end value of the modulation interval. The Scale beta value spin box can be used to specify a value (default: 10.0) for scaling the estimated percent signal change beta values. The text field on the left side of the Close button shows the last mean feedback value that has been stored to disk.
Multiple ROIs. Feedback can be based on the signal from a single open ROI or from the combination (average) from multiple ROIs allowing to combine separately defined regions for combined (averaged) feedback. The combination of ROIs can be performed by selecting the respective option in the Based on time course / classifier field. Options for multiple ROIs are only available if multiple ROIs are defined. In the example used for the snapshot below, two ROIs were defined and thus the options are enabled to select ROI 1 or ROI 2 for feedback as well as the option to use the combined signals, ROI 1 + ROI 2, as the source of neurofeedback. In the case of three ROIs, the respective options to combine two ROIs become available as well as the option to combine all three ROIs. While you can define more than three ROIs and observe the respective time courses in the Time Courses Container, the Neurofeedback dialog will only process the first three ROIs.
As default, the Average multiple ROIs option is enabled in the Multi-ROI integration field allowing to combine multiple ROIs for a single neurofeedback display. When turning on the Visualize multiple ROIs option, the data from two regions will be fed back to the subject (see snapshot below). Note that this option only works in case that two ROIs have been defined and the Thermometer display option has been selected as feedback type.
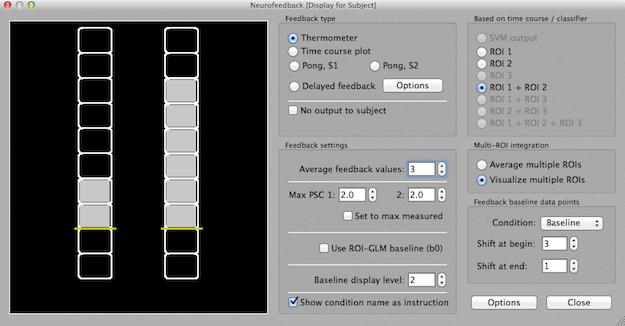
The Baseline display level field sets the "zero level" at a vertical position of the bar display. As default, this value is set to "0", which means that the whole display is dedicated only for positive feedback values. If the value is set to "1", the zero level will be between the lowest (first) and second lowest (second) rectangle of the bar, i.e. one rectangle (the lowest one) would be used for showing negative feedback values and the other 9 rectangles would be used to show positive feedback values. If the baseline display level is larger than 0, the zero level is indicated by a yellow horizontal line as shown in the snapshot below for the case of a baseline display level of "2".
The Show condition name as instruction option provides a simple way to present a short instruction to the subject to signal the begin of experimental conditions (i.e. neuromodulation blocks vs baseline blocks). The instruction is shown below the thermometer display one time point before the begin of a block (see snapshot at begin of this topic showing the instruction "inner speech"). This provides an easy way to signal the begin (and end) of "rest" and "modulation" blocks to the subject.
No-feedback condition. While the No output to subject option is helpful to temporarily turn off feedback to the participant in the scanner during phases of a neurofeedback run, a more systematic approach is to specify a condition as a "no-feedback" condition. This can be done in the Neurofeedback Options dialog (see snapshot below) that can be invoked using the Options button in the lower right corner of the Neurofeedback dialog.
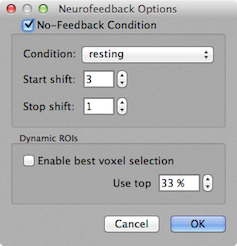
To enable the use of a no-feedback condition, check the No-Feedback Condition field. As default, the first condition of a stimulation protocol will be selected as the no-feedback condition. You can use the Condition box to select any other protocol condition. To accommodate the hemodynamic delay, you may also "shift" the intervals of the selected no-feedback condition. Use the Start shift spin box to let the no-feedback condition start later and use the Stop shift spin box to let the no-feedback condition end later. For details on how the default shift values are calculated, see the explanation in the Baseline Identification and Calculation section of the ROI Activation Feedback Calculation topic.
Note. As mentioned above, please consult our support team for help with stimulus presentation of feedback informaiton. A simple stimulus presentation software, Neurofeedback Presenter, had been previously bundled with TBV allowing to present the generated images to the subject in the scanner. While we recommend more advanced software, the simple presenter software can be provided on request. The presenter software needs to be copied to a separate stimulus presentation computer that has access to the TBV neurofeedback target folder. For more advanced feedback visualizations, Brain Innovation also supports (and contributes to) a comprehensive open source presentation software called BrainStim (see Setup for Neurofeedback) that can be downloaded at https://svengijsen.github.io/BrainStim/.
Copyright © 2002 - 2024 Rainer Goebel. All rights reserved.