BrainVoyager v23.0
Adding Datasets
Starting with NIfTI Files
In case NIfTI files are already available (e.g. downloaded from public repositories or produced by other software), one can simply copy (or move) them in the sourcedata folder of a created project folder inside the current (or to be used) root Projects folder. The subjects and their data should then automatically be detected and displayed in the Subjects pane and Data tab, when selecting the respective project in the Projects pane. Simply make sure that the organization of the data follows the one described in the Overview and BIDS Compatibility topics. You can then optionally add a project-specific meta-information JSON file by clicking the Edit Project icon in the Projects pane as described in the Create New Project topic. Similarly meta-information can be optionally added for each subject by using the Edit Selected Subject icon in the Subjects pane as described in the Add Subject to Project topic. These files are used by the Data Analysis Manager but are not strictly needed to analyze data using workflows.
Starting with DICOM Files
Since the workflows of the Data Analysis Manager expects NIfTI files as input, DICOM files need to be first converted into NIfTI files together with JSON (and other) sidecar files and placed inside a directory tree that follows the BIDS standard. This can be achieved in BrainVoyager using either the Create Document Wizard dialog or the DICOM To NIfTI tool of the Data Analysis Manager. Another efficient possibility (not described in this topic) is to write Python code (e.g. in a script file or a BV notebook) with commands like create_vmr_dicom_nifti_bids and create_fmr_dicom_nifti_bids. The arguments of these commands specify a project path as well as additonal information such as a subject, session and run number that are used to place the converted NIfTI (and sidecar) files in the appropriate location inside the project directory tree.
Using the 'Create Document Wizard'
DICOM files can be converted to NIfTI files using the standard Create Document Wizard as described in topics in the Getting Started chapter to create anatomical, functional and diffusion-weighted documents. When reaching the Target Location page of the wizard, it is important to check (turn on) the options Save document in NIfTI format and Add NIfTI plus sidecar files to (new) BIDS project (see arrows in the figures below); the latter option will actually be automatically turned on when checking the Save document in NIfTI format option.
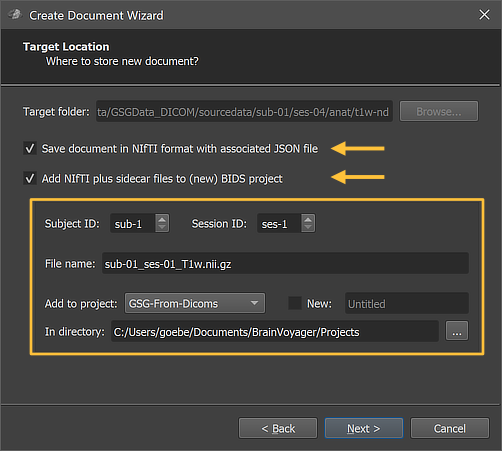
The figure above shows the respective page of the Target Location page of the wizard when creating an anatomical (VMR) document. When changing the subject and session number in the Subject ID and Session ID fields, the File name text field is updated accordingly. Furthermore, the resulting NIfTI file can be added to an existing project using the Add to project field or it can be placed in a new project folder (if its the first dataset) by checking the New option. In the latter case the project name (folder) can be provided in the text field on the right side of the New option.
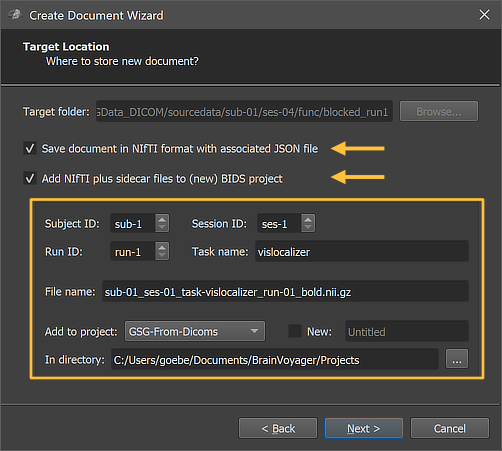
The figure above shows the Target Location page of the wizard when creating a functional (FMR) document from DICOM files. Most settings are the same as described above except that for functional documents a run number and a task name need to be provided additionally in the Run ID and Task name fields, respectively. The page for diffusion-weighted (DMR) documents looks similar but does not show the Task name field.
Using the Create Document Wizard in this way for all datasets of all subjects, the sourcedata folder of a chosen project will be filled incrementally according to the BIDS standard. After preparing the NIfTI data of at least one subject for a project, preprocessing workflows can be defined to analyze the data in a consistent and reproducible manner as described in subsequent topics.
Using the 'Convert DICOM To NIfTI' Tool
A more efficient way to create NIfTI documents from raw DICOM files is provided by the Convert DICOM To NIfTI dialog of the Data Analysis Manager. This dialog can be launched by clicking the DICOM To NIfTI icon in the main toolbar of the Data Analysis Manager window. The dialog allows to convert the datasets of multiple subjects in batch mode using internally the Python commands "create_{doc-type}_dicom_nifti_bids" mentioned above for each entry in the conversion tables of the dialog.
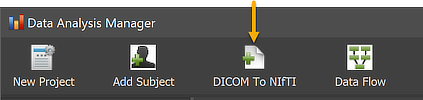
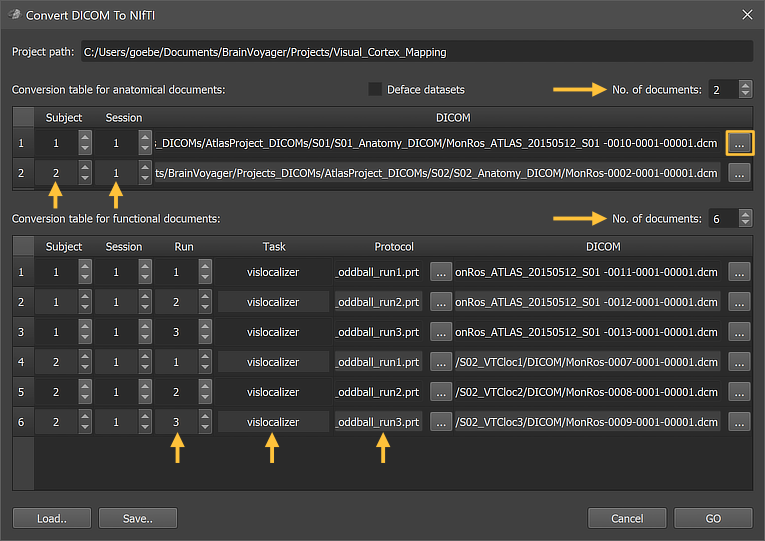
After clicking the DICOM To NIfTI icon (see figure above), the Convert DICOM To NIfTI dialog will appear (see figure below). At the top, the path to the currently selected project is shown in the Project path field indicating where the converted NIfTI data will be stored. The main part of the dialog contains two tables that allow to specify a DICOM series (with a specific file, usually the first, of the series) that will be converted into a corresponding NIfTI file. To add entries into the table, the No. of documents number spin box can be used.
Anatomical (VMR) Documents Table
Each row of the first table provides the information for the DICOM to NIfTI conversion for an anatomical dataset. More specifically, each row associates a DICOM series with a subject and session number specifying the location and file name of the converted NIfTI file (plus sidecar files) in the BIDS directory tree of the currently selected project. The subject and session ID'S can be entered using the spin boxes in the respective cells of the table (see arrows in the figure below). In order to specify the DICOM data for a document, the Browse button on the right side of the Dicom cell of each entry can be used (see rectangle in figure below). Clicking the Browse button will present a standard Open File dialog that can be used to select the location of a single file of a DICOM series. Note that it is not required to select a specific (e.g., first) DICOM file of a DICOM series in the appearing standard Open File dialog - any file of the series is sufficient. In the example shown below, the first file of respective DICOM series has been selected as can be seen by the last number in the DICOM file names ('[..]-00001.dcm'). It is also possible to deface 3D anatomical datasets by checking the Deface option. If turned on, the program's standard deface routine will be executed for each dataset and the converted NIfTI files should have tissue removed in such a way that a person can no longer be identified by 3D volume or surface rendering.
Functional (FMR) Documents Table
Each row of the second table handles the DICOM to NIfTI conversion for a functional document. The conversion tool supports standard single-image DICOM files, Siemens mosaic DICOM files and enhanced multi-frame DICOM files (1 file per volume). As for anatomical datasets, a subject and session number is provided. Together with an additional run number and task name (see arrows in figure above), these entries determine the file name as well as the location of the converted NIfTI (and sidecar) files inside the directory tree of the current project. As an additional optional (recommended) item, a protocol file can be provided either as an onset-duration TSV file or as a BrainVoyager PRT file that will be converted into a TSV file. The protocol file may be the same for each subject but usually different protocol files are used in order to allow a different order of condition trials or blocks per run and subject. Usually one wants to enter multiple entries for subjects, sessions and runs with the same task name ("vislocalizer" in the figure above); for this case it is useful to start by adding one row first using the No. of documents spin box. In the added row, one enters the task name in the respective cell. When one then adds additional rows by increasing the No. of documents value, the previously entered task name will be used as default for all added rows (until one enters a new name).
Diffusion-Weighted (DMR) Documents Table
Each row of the third table handles the DICOM to NIfTI conversion for a diffusion-weighted document. The conversion tool supports standard single-image DICOM files, Siemens mosaic DICOM files and enhanced multi-frame DICOM files (1 file per volume). As for anatomical datasets, a subject and session number is provided. Together with an additional run number, these entries determine the file name as well as the location of the converted NIfTI (and sidecar) files inside the directory tree of the current project. As an additional optional item, a gradient table (GRB) file can be provided but this is usually not necessary since gradient and b value information is extracted from the DICOM headers in most cases.
The tables can be saved and loaded as a D2N (DICOM to NIfTI) text file using the Save and Load buttons, respectively. This makes it possible to incrementally expand the entries when more subjects become available as well as to generate the D2N file externally, e.g. by using a text editor or by writing a script file. The entered or loaded entries can be processed by clicking the GO button in the dialog, which will start the DICOM to NIfTI conversion process for the entered or loaded entries.
The minimal example used here has 8 entries for 2 subjects, each with one DICOM series of a scanned anatomical dataset and three DICOM series for three functinoal runs. The figure below shows the resulting NIfTI files for subject 2 in the Data tab of the Data Analysis Manager.
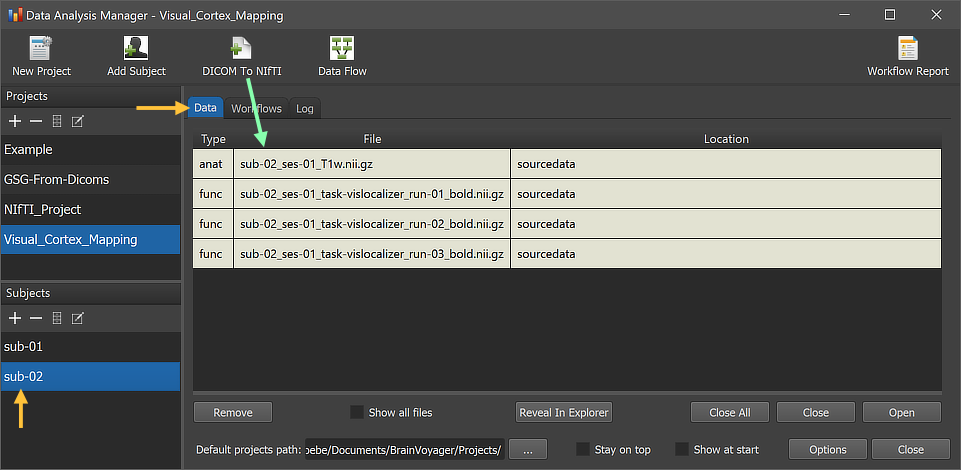
The substrings of the file names (e.g. "sub-[]", "ses-[]", run-[]") indicate that they have been generated from the provided subject, session and run numbers. Also the provided task name ("vislocalizer") for the three functional runs is appearing in the "task-" substring of the functional file names. Note that BrainVoyager always uses (and expects) the "ses-" and "run-" substrings even if BIDS would allow to drop them in case that only one run or session (as in the example case) is available. Note that you can simply double-click a NIfTI file to open it in BrainVoyager's multi-document area.
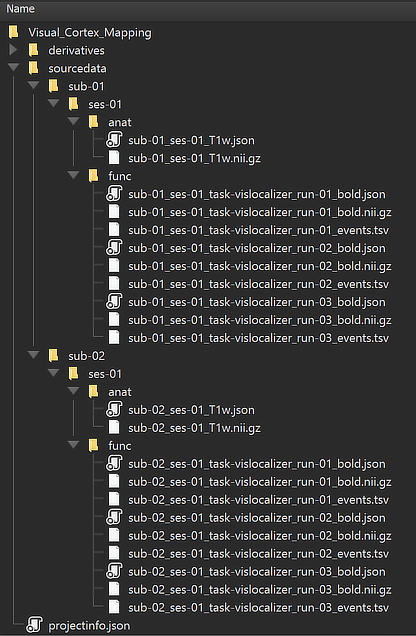
The figure above shows the created data files inside the sourcedata directory of the 'Visual_Cortex_Mapping' project. This
After creating the NIfTI data, preprocessing workflows can be defined to analyze the data in a consistent and reproducible manner as described in the following topics.
Copyright © 2023 Rainer Goebel. All rights reserved.