BrainVoyager v23.0
Head Skin Segmentation and Reconstruction
Visualizing the skin surface is very easy since the intensity values of the skin surface are much higher than those of the surrounding background. If one wants a nice rendering of teh full head, one should ensure that the anatomical scanning sequence is set-up accordingly, especially on high-field scanners. To improve results of head mesh reconstruction, the only recommended preparatory step is a "cleaning" procedure, which sets the intensities of voxels outside the head to 0 ("black"). This can be done automatically using the Clean button in the Segmentation tab of the 3D Volume Tools dialog or in the 16 Bit 3D Tools dialog for 16-bit data. In case that the data exhibits strong intensity inhomogeneities, it is recommended to run the inhomogeneity correction tool first but without the Include mask generation (brain extraction) option which is enabled as default. Followed by a cleaning operation as described above, one should then have a well prepared 3D anatomical VMR data set for head skin reconstruction.
If one wants to perform "background cleaning" manually, the region growing tool and the reload marked tool located in the Segmentation tab of the 3D Volume Tools dialog can be used. Region growing is prepared by clicking somewhere inside the head to specify a "seeding voxel" with high enough signal intensity for a region growing operation. Since not just the brain must be marked but also the voxels belonging to the head, a low value for the Min entry in the Value range field must be chosen. Useful values are typically in the range of 40-60. The Max value can be set to 225 (or higher). Note that the intensity of the seed voxel must fall within the specified range, otherwise the segmentation will not spread to neighboring voxels. To start the region growing process, click the Grow Region button. If the result is not optimal, i.e. does not include the head, or spreads into the background, adjust the minimum threshold and repeat the process. If the head is marekd successfully (marked with "blue" colored voxels), click the Marked button in the Reload field. This will reload the original intensity values of the voxels in the segment, but sets the intensities of all other voxels (ioutside the head) to zero intensity. One can then use the skin surface reconstruction tool (see below) of the 3D Viewer to generate a mesh surface that visualizes the skin surface. It is also possible to create a sphere mesh using the Create Mesh dialog.

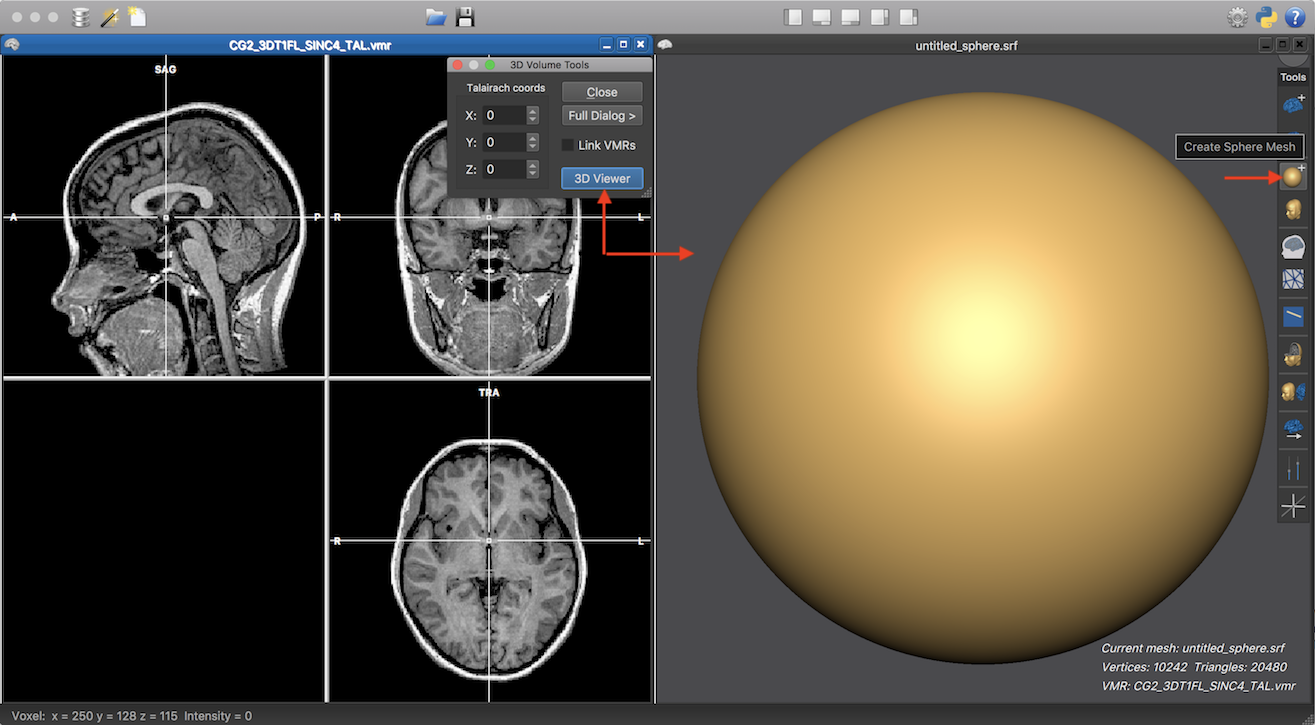
The snapshot above shows a cleaned VMR data set on the left side. In order to reconstruct the skin surface, a sphere mesh can be created in the 3D Viewer (OpenGL) window, which can be called in many ways. One way indicated in the snapshot above (see red arrows in the middle is to click the 3D Viewer button in the 3D Volume Tools dialog. To create a starting sphere (that will be "wrapped around" the non-background voxels of the prepared VMR document) is to simply click the Create Sphere Mesh icon (see red arrow on the right). The snapshot above shows the created sphere mesh. When clicking now the Wrap Volume Mesh Morphing icon (see icon below the Create Sphere Mesh icon), the created shpere mesh will start to shrink. If a moving vertex detects a non-background voxel with high intensity values, its movement is stopped which leads overall to a reconstruction of the skin surface. The figure below shows three stages during this shrink-wrapping process. in case you want to set the intensity value for this process, you can also start the morphing via the Mesh Morphing dialog where you can turn off the Smoothing mode option; you can enter a specific value for the Find intensity field as well as a custom value for the Value field in the Surface finding force options.

The reconstructed head mesh can be inspected and manipulated using standard features of the 3D Viewer. It is also advisabble to save the reconstructed skin mesh to disk using the Save Mesh As item in the Meshes menu.
Copyright © 2023 Rainer Goebel. All rights reserved.