BrainVoyager v23.0
Creating Diffusion-Weighted Documents
Essential document types can be created from scanner data using the Create Document Wizard dialog (see below) that can be invoked using the New Document Wizard icon in the main toolbar or by using the New Document Wizard item in the File menu. For special cases requiring more flexible options, one can also use the Create Document fom MRI Data dialog that can be invoked using the New Document icon or the New Document item in the File menu. When creating and analyzing several documents belonging to a larger project, it is recommended to create documents using the Data Analysis Manager.
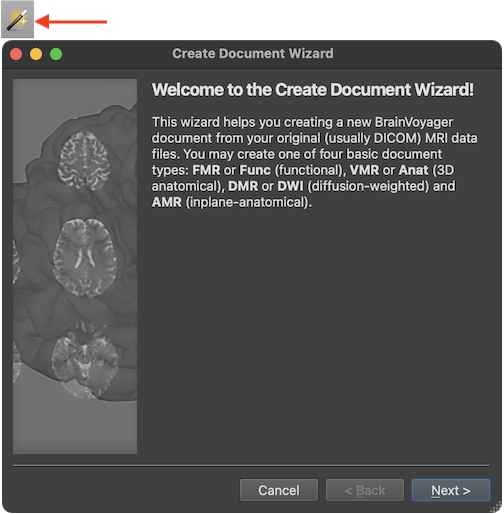
The screenshot above shows the first Introduction page of the Create Document Wizard presenting text stating that four basic document types can be created, namely functional (4D) MRI projects, called FMR in BrainVoyager, slice-based inplane anatomical documents (AMR in BrainVoyager), 3D high-resolution anatomical documents (VMR in BrainVoyager) and diffusion-weighted documents (DMR in BrainVoyager). The creation of DMR documents is described below as well as in chapter Diffusion-Weighted Imaging Analysis. AMR documents help to visualize the anatomy of the brain in the same slice orientations than those recorded by FMR projects but inplane anatomicals are less used nowadays than in the early years of fMRI when high-resolution 3D MRI data sets were not regularly acquired.
After clicking the Next button, the wizard presents the Document Type page that can be used to select one of the described document types in the Document Type field. When selecting a document type, the Description field describes the purpose of the respective document type. In case one wants to correct or change selections made at some point while walking through the wizard, the Back button can be used to go to an earlier stage. The Cancel button can also be used to quit the dialog without creating the document.
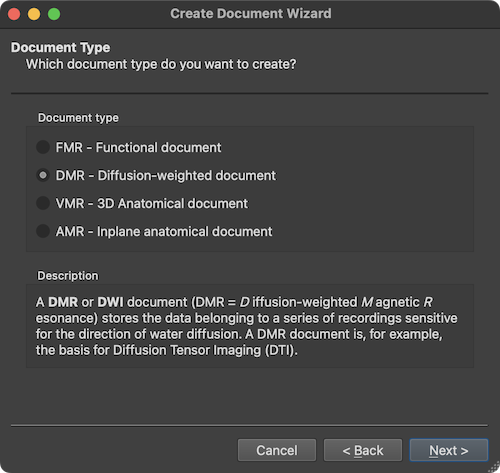
In order to create a 4D document containing a series of 3D diffusion-weighted volumes from a single scan in a scanning session, the DMR document type needs to be selected in the Document type field. Diffusion-weighted MRI data is often recorded using the Echo Planar Imaging (EPI) pulse sequence. Individual volumes are the result of weighting the diffusion of protons in a specified direction (expressed as a x, y, z vector) and a specified strenght (expresses as a b value), for details, see chapter Diffusion-Weighted Imaging Analysis. To obtain volumes with different diffusion-weighting, the brain is scanned repeatedly over time. After clicking the Next button, the scanner file format can be selected on the Scanner Data Format page of the wizard.
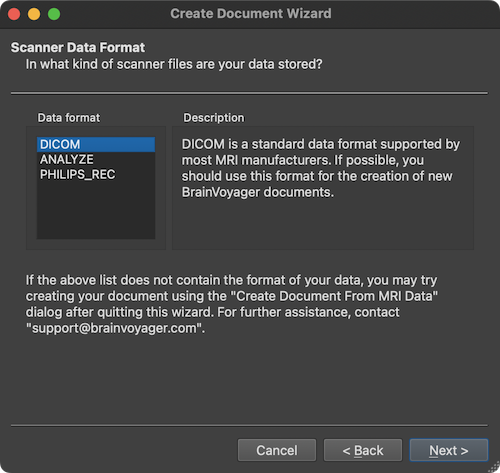
In the screenshot above, the most usual scanner data type "DICOM" is selected as default in the Data format field. The ANALYZE format was used in the early years of neuroimaging and should no longer be used since it has been superseded by the NIfTI file format (which can be directly loaded by BrainVoyager). The PHILIPS_REC format is used on scanners from manufacturer Philips. It is however advised to use DICOM files also with Philips scanners, if possible. In order to select the DICOM files from which the DMR document should be created, the Select Data Location page will appear after clicking the Next button (see below).
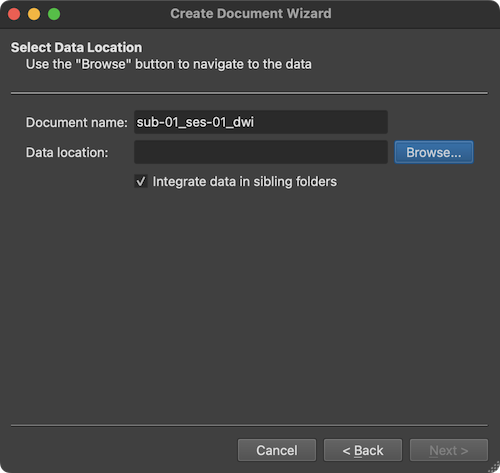
The Document name text field suggests the name "untitled" for the to-be-created diffusion-weighted MR document, which should be changed. It is suggested to provide names that follow the BIDS specification as is also done when using the Data Analysis Manager to create documents.
Note. Since version 22.0 of BrainVoyager, the Create Document Wizard allows to create documents in NIfTI format and to store it in BIDS project folders. If you use this option, the name need not to be changed since a BIDS-compatible name will be generated automatically (see below).
Since the example data used here is from the first scanning session of the first subject, the name "sub-01_ses-01_run-01_dwi" has been entered. In order to select the scanned DICOM files, the Browse button on the right side of the Data location field is used to invoke a standard File Open dialog. In this dialog, any file inside the directory containing the data can be selected. In the screenshot above, a DICOM file has been selected. After selection of a file, the Open button should be clicked, which will start a process that analyzes the contents in the selected directory.
Note. In this step it is only important that the directory containing the data is selected. It does NOT matter WHICH file is selected inside that folder, which can be even a non-DICOM file. The files inside the selected folder will be analyzed and the result will be presented subsequently for the actual scanner data selection (see below).
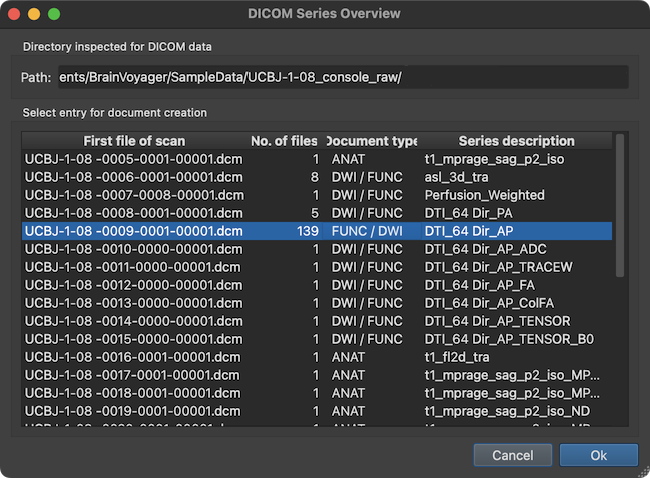
After analyzing the contents in the selected directory, the result is presented in the DICOM Series Overview dialog. This dialog does not show individual DICOM files but one entry per scan corresponding to a DICOM *series*. The screenshot above shows that the program found many MRI series in the folder shown in the Directory inspected for DICOM data field as well as in all sibling folders. The program also classifies the DICOM series found according to the document type that is likely matching the respective files on disk. The selected series is classified as either a 'FUNC' or 'DWI' file. The Series description column of the table shows the name of the series extracted from the DICOM header. The series description name is often very useful to identify the type of scan of a series. The name 'DTI_64 Dir_AP' indicates that the selected series is a 'DTI' scan with 64 different directions (the 'AP' substring indicates that the phase encoding direction of the scanned images was in the anterior-to-posterior direction, which is relevant for EPI distortion correction). Since 139 files belong to the series as shown in the No. of files column, it is likely that each direction has been scanned twice (the remaining 11 (139 - 2 x 64) 3D images would then be non-diffusion (b0) weighted reference volumes). Details about the direction weighting of each volume is usually obtained from the header of the DICOM files (here, the data is stored in 'enhanced' multi-frame DICOM files).
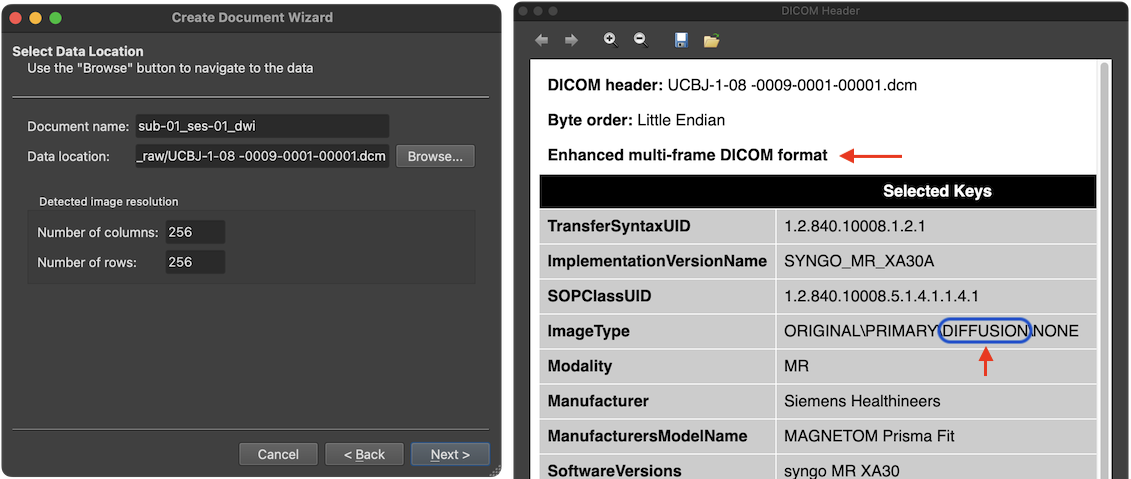
After accepting the selected DICOM series, the Select Data Location page is updated reflecting the chosen scan data by filling the Data location entry with the first DICOM file of the selected series (here '9') and by showing the dimensions of the individual slices in the Detected image resolution field. The individual slices may be stored either in individual DICOM files, in mosaic files or in multi-frame DICOM files (as in the example data used here, see upper red arrow in screenshot above). Multi-frame enhanced DICOM files and SIEMENS mosaic files usually store the slices belonging to one volume in a single DICOM file.
The presented DICOM Header window shows important (but not exhaustive) fields of the DICOM header from the first DICOM file of the selected series. More details about how BrainVoyager uses some of these fields can be found in topic Coordinate Systems. Note that the 'ImageType' entry of the DICOM header identifies the file as containing 'DIFFUSION' data.
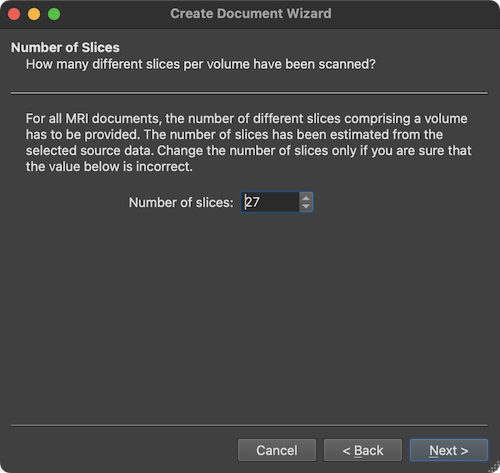
After the Next button is clicked, the wizard presents the Number of Slices page showing the number of slices that form a single diffusion-weighted volume (stored either in spearate files on disk, or in a single multi-frame or mosaic file). The value in the Number of slices field (here: 27) is usually correct and needs not to be changed (except in case one wants to read only part of the data) and is presented primarily for information and verification. The page can be accepted by clicking the Next button.
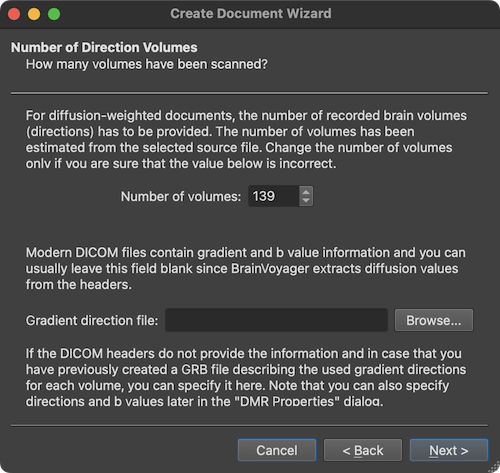
The wizard now shows data related to the number of volume measurements (4th dimension). The Number of volumes field shows the number of diffusion volumes (here: '139'). The displayed number usually needs not to be changed and is mainly shown for information purposes and to verifiy whether the number fits the expected number (if known). The Gradient direction file field is only relevant for old DICOM files that did not contain diffusion-related information in the header files. For these old files, a gradient direction file can be specified here or after the document has been created (for details see chapter Diffusion-Weighted Imaging Analysis). In case of modern multi-frame (enhanced) DICOM files or mosaic files this entry can be ignored.
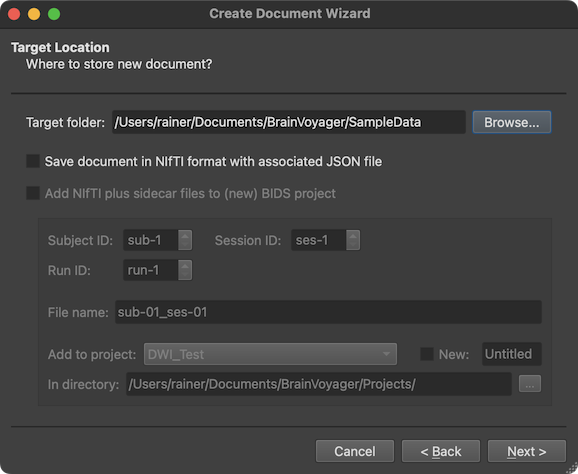
The wizard now shows the Target Location page (see screenshot above). Using the Browse button on the right side of the Target folder field one can specify a target folder where the created document (and associated files) will be stored (if the location has write permission). By selecting the Save document in NIfTI format option (with the Add NIfTI to BIDS project option below turned off), one can also chose to create a NIfTI file (with associated sidecar files) as output in the selected target folder instead of the standard BrainVoyager document file. As default, the directory shown in the Target folder field is the parent folder (or the same folder) where the source DICOM files were located by the user. In order to not mix the source data location with the location of created documents, it is recommended to chose a folder that is different from the source DICOM files.

If the Save document in NIfTI format output option is chosen together with the Add NIfTI to BIDS project option, the directory specified in the Target folder field is ignored since in this case the created NIfTI file (with sidecar files) is placed within a chosen (or created) BIDS project folder tree. NIfTI files saved in this way can directly be used as raw input for project-level data analysis pipelines using the Data Analysis Manager . When chosing this (recommended) option, one needs to specify the subject, session and run to which the diffusion-weighted dataset belongs using the Subject ID, Session ID and Run ID spin boxes. In the example, only the subject number has been changed to '3'. The resulting file name can be previewed in the File name text field. Futhermore, one needs to specify whether the dataset should be stored in an existing project or a new project. An existing project can be chosen from the Add to project box, which, when clicked, lists all project folders currently available in the projects folder. The projects folder can also be changed by using the Select (...) icon on the right side of the In directory field. If one wants to store the NIfTI data in a new BIDS project, the New option needs to be turned on and a project folder name needs to be entered in the New Project text field on the right side of the New option to change the 'Untitled' default name. When all settings have been made, one can proceed to the Summary page using the Next button.
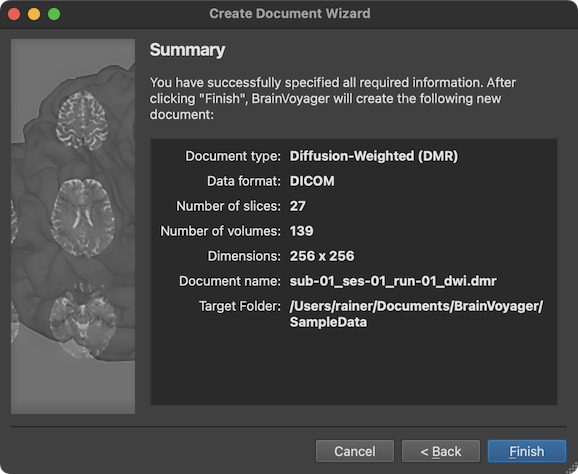
The final page presented by the wizard is the Summary page, which can be used to review the assembled and entered information (see screenshot above). Note that the Summary page looks slightly different in case one has chosen to store the data in NIfTI / BIDS format in the Target Location page (see screenshot below).
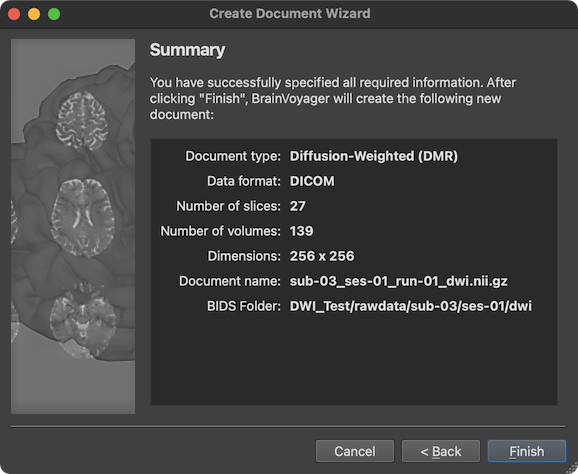 When clicking the Finish button, the diffusion-weighted data will be created as a DMR BrainVoyager document by assembling the individual DICOM files in a common data structrue and by storing relevant information from the DICOM headers in the header of the resulting DMR file. Note that the DMR file is a human-readable text file, which links to associated data including the actual 4D diffusion data stored in a DWI (diffusion weighted image) file and additional helper filles. In case one has chosen to store a NIfTI file, the created DMR document is converted immediately into a NIfTI file. The progress of conversion (mainly the compression of the data) will be displayed volume-by-volume in the Log tab. If the BIDS project folder option has been selected, the converted NIfTI file will be stored in the respective BIDS project folder together with a JSON sidecar file. In case that diffusion graident and b values could be extracted from the header, additional '.bvec' and '.bval' files are also generated (see screenshot of porject folder below.

After the DMR document has been created or the generated NIfTI file has been opened, the diffusion-weighted data will be displayed in BrainVoyager's mutli-document area (see screenshot below showing the new document in tabbed mode). The screenshot shows the slices (from the first volume) as well as the DMR Properties dialog displaying header information from the DMR file as well as providing some processing options. The displayed header information includes the number of slices in the NrOfSlices field, the number of volumes in the NrOfVolumes field as well as information about the spatial and temporal resolution of the data in the Voxel resolution definition and Temporal resolution and slice timing definition fields, respectively.
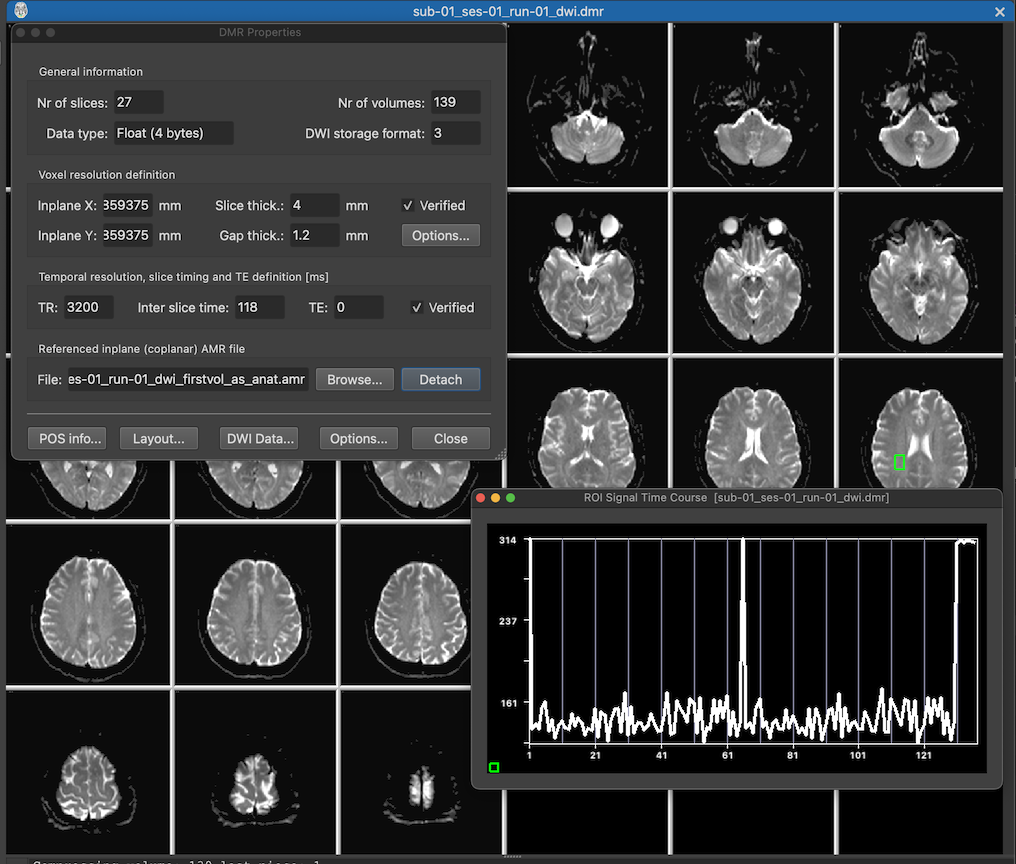
The green square on the right slice in row 3 has been created using a dragging operation with the left mouse button, which can be used to inspect the diffusion time course data of single voxels or regions at the respective location. After releasing the mouse button, the ROI Signal Time Course plot will appear diaplaying the diffusion values at the selected region over time. The plotted curve shows a few volumes with very high values indicating those volumes as non-diffusion-weighted (b0) reference images.
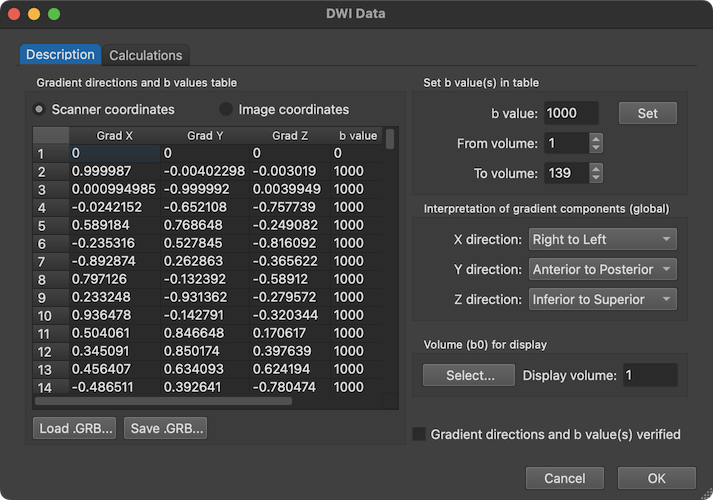
When clicking the DWI Data button of the DMR Properties dialog, one can see the x, y and z diffusion gradient values in the table on the left side as well as the b value for each volume as extracted from the DICOM headers. The first volume has both '0' values for the gradient components as well as the b value and, thus, corresponds to a non-diffusion weighted reference image explaining the high value at the begin of the displayed time course plot above.
Copyright © 2023 Rainer Goebel. All rights reserved.